2011 Demo Reel from Paul F Kelly on Vimeo.
Showing posts with label Maya. Show all posts
Showing posts with label Maya. Show all posts
Tuesday, August 9, 2011

Wednesday, June 29, 2011
zSurgical
For my advanced surgical illustration course, I took on the challenge of constructing the sequence of images using Pixologic's ZBrush. I fell in love with this software very quickly and plunged myself into learning as many of it's features as possible to complete the main project for my surgical course. I was very fortunate to link up with an amazing surgeon at St. Michael's hospital in Toronto, who allowed me to observe and sketch during several spinal procedures. I have posted sketches from these OR experiences as well as the worked-up sequence sketches in previous posts.


I used a variety of "alphas" in zBrush to sculpt details on various tissue types. Alphas function very much like custom brushes in Photoshop, and can greatly enhance the organic quality of a 3D model.


This ended up being a mistake in my process. What I should have done was convert these higher subdivision levels into displacement maps, but unfortunately I didn't figure out how to do this until later on down the road, even though the process turned out to be incredibly easy. Live and learn.

Figuring out the rendering system in ZBrush was another hurdle, but one I enjoyed, as it is a very satisfying stage to reach in the 3D workflow. I tried rendering in Maya as well, which allows for more camera control and lighting, but in the end I chose to stick with zBrush for the rendering. This project is still ongoing, but in the very last stage. It has already gone through several iterations in Photoshop and Illustrator. I will be submitting the final work to the AMI Salon at the upcoming conference in Baltimore, and I can't wait to get feedback from the plethora of talented artists in attendance.


Monday, June 20, 2011
MRP update
Here are some of the initial renders from my Master's Research Project concussion animation. I've finally got a few scenes finished...for now.


Wednesday, June 1, 2011
More lighting and shading
Tweaking the blinn shader settings thanks to a tutorial from my instructor, Marc Dryer. I made adjustments to the lighting set up as I went along...


And a few with the brain with it's sub-surface scattering shader:


Monday, May 30, 2011


Friday, May 27, 2011
Neuron Shading
Spent the day multi-tasking on Maya, modeling while waiting for renders to finish. I spent a good amount of time tweaking the settings on the Maya native Ramp Shader, which has produced some nice results for me in the past. Here is a progression on the day's work:


Tuesday, May 10, 2011
Brain Lighting Experiments
The Master's Research Project is in full gear. Yesterday I rendered out a series of images to test different lighting setups for my animation scenes. Shown here are a few of those tests, featuring the latest version of my 3D brain model. The first image shows the model rendered in Maya with a mia Mental Ray shader, which allows for some cool glass-like effects (Mental Ray is a rendering engine). I am experimenting with the possibility of showing the outer cortex with this glassy effect so that the internal structures are visible, however for now its still in the experimental stage.

Here the brain is looking a little too dark, with only one light in the scene it's not a surprise. In this next image I've added a second light coming from the bottom right, opposite from the main "key" light which is shining from the top left. This second "fill" light exposes more of the model's form, but with a lower intensity setting and shadows turned off in the light's attributes, it doesn't detract from the main light source.

For the final touch, I added a third light in the scene for the sole purpose of producing caustics. Caustics are the refracted light elements that show up inside the shadows of a glass object. It's quite a process, and I certainly haven't mastered it yet, but the meager results I've come up with so far seem worth further investigation.
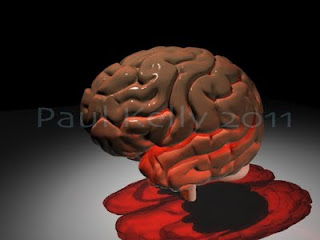
In this last image, I've switched to a different shader, the Mental Ray sub surface scattering (SSS) default. This allows for the light hitting the model to almost "sink-in" and appear to bounce around inside. In order for this shader to work correctly, I added another light directly behind the model so that it would shine through, otherwise the SSS effect wouldn't be as noticeable. I'm content with the lighting setup for now, so the next experiment will involve tweaking all the settings on the shaders and adding textures.


Here the brain is looking a little too dark, with only one light in the scene it's not a surprise. In this next image I've added a second light coming from the bottom right, opposite from the main "key" light which is shining from the top left. This second "fill" light exposes more of the model's form, but with a lower intensity setting and shadows turned off in the light's attributes, it doesn't detract from the main light source.

For the final touch, I added a third light in the scene for the sole purpose of producing caustics. Caustics are the refracted light elements that show up inside the shadows of a glass object. It's quite a process, and I certainly haven't mastered it yet, but the meager results I've come up with so far seem worth further investigation.

In this last image, I've switched to a different shader, the Mental Ray sub surface scattering (SSS) default. This allows for the light hitting the model to almost "sink-in" and appear to bounce around inside. In order for this shader to work correctly, I added another light directly behind the model so that it would shine through, otherwise the SSS effect wouldn't be as noticeable. I'm content with the lighting setup for now, so the next experiment will involve tweaking all the settings on the shaders and adding textures.

Thursday, April 7, 2011
3D Surgical Tools
Here are some of the surgical tools I've modeled for use in my 3D surgical illustration. I've been experimenting with the rendering capabilities of both Maya and ZBrush. The heads of the screws in the first few rongeurs were not modeled because I knew I would be using an alpha in ZBrush to "stamp" the shape onto the mesh, a huge time-saver!
Angled Rongeur bone cutters:

"Duckbill" Leksell Rongeur:

Same as above rendered in Maya:

Cloward Punch aka Kerrison Rongeur:

Saline irrigation syringe, Suction tube, Cobb instrument and Curette:

Angled Rongeur bone cutters:

"Duckbill" Leksell Rongeur:


Same as above rendered in Maya:

Cloward Punch aka Kerrison Rongeur:

Saline irrigation syringe, Suction tube, Cobb instrument and Curette:

Saturday, April 2, 2011
ZBrush course at TSA
Today marked the end of the Digital Sculpting with ZBrush course I was taking at Toronto School of Art. For my personal project I made a complete vertebral column and a skull.
For inspiration, I looked at what other medical artists are producing using ZBrush, such as the femur seen below by Sarah Hegmann of the Chicago Biomedical Visualization program. The adjacent skull is by Eric Keller. For the level of detail I was hoping to achieve, I looked at more traditional medical art such as following pen & ink illustrations by Steve Harrison. I also found the work of ZBrush artist Scott Eaton particularly inspiring in terms of eventually integrating my anatomical knowledge into a better understanding of how to represent the human figure.
 I used both plastic and real bones as references. Often in illustrations, it is not always wise to rely entirely upon plastic models because light does not reflect off of plastic in the same way it does from real bones.

 Under the guidance of my professor Marc Dryer, who has some experience integrating the modeling capabilities of ZBrush with those of Maya, I made preliminary, low-resolution mesh models in Maya first, and then brought them into ZBrush. Pixologic has provided an excellent plug-in for just this purpose, GoZ. The GoZ can be configured to link up with Maya, Cinema4D or Modo to allow jumping back and forth between programs with the simple click of a button. I found that grouping multiple objects together in Maya was necessary to make sure everything aligned properly when it was sent to ZBrush, this was particularly an issue with the teeth...


 Because I know that eventually I will be seeking approval of my 3D models from a surgeon who specializes in spine procedures, I tried to pay close attention to minor details such as the angles of the articular facets and the attachment sites for bones and muscles which are not present in this particular model...

 As I moved up in subdivision levels, I tried to go slowly, making sure every detail was accounted for at the earliest possible stage. The process shot below also betrays an important detail I have not yet attended to: the orbital fissures.
 While ZBrush does have a fairly decent bone material preset, I played around with making one of my own using the MatCap tool, new to ZBrush 4.0. I learned how to use this thanks to an excellent tutorial by Eric Keller. For any who seek to use ZBrush for scientific or medical work, Mr. Keller's tutorials are a must-see.


 These are my final submissions for the purpose of the TSA course, but I will continue to work on these models to fine-tune all the important details. And within a week, I will have a surgical scene set-up with the lumbar vertebrae and sacrum complete with joint capsules, ligaments, muscles, cauda equina and more...
For inspiration, I looked at what other medical artists are producing using ZBrush, such as the femur seen below by Sarah Hegmann of the Chicago Biomedical Visualization program. The adjacent skull is by Eric Keller. For the level of detail I was hoping to achieve, I looked at more traditional medical art such as following pen & ink illustrations by Steve Harrison. I also found the work of ZBrush artist Scott Eaton particularly inspiring in terms of eventually integrating my anatomical knowledge into a better understanding of how to represent the human figure.
 I used both plastic and real bones as references. Often in illustrations, it is not always wise to rely entirely upon plastic models because light does not reflect off of plastic in the same way it does from real bones.
 Under the guidance of my professor Marc Dryer, who has some experience integrating the modeling capabilities of ZBrush with those of Maya, I made preliminary, low-resolution mesh models in Maya first, and then brought them into ZBrush. Pixologic has provided an excellent plug-in for just this purpose, GoZ. The GoZ can be configured to link up with Maya, Cinema4D or Modo to allow jumping back and forth between programs with the simple click of a button. I found that grouping multiple objects together in Maya was necessary to make sure everything aligned properly when it was sent to ZBrush, this was particularly an issue with the teeth...

 Because I know that eventually I will be seeking approval of my 3D models from a surgeon who specializes in spine procedures, I tried to pay close attention to minor details such as the angles of the articular facets and the attachment sites for bones and muscles which are not present in this particular model...
 As I moved up in subdivision levels, I tried to go slowly, making sure every detail was accounted for at the earliest possible stage. The process shot below also betrays an important detail I have not yet attended to: the orbital fissures.
 While ZBrush does have a fairly decent bone material preset, I played around with making one of my own using the MatCap tool, new to ZBrush 4.0. I learned how to use this thanks to an excellent tutorial by Eric Keller. For any who seek to use ZBrush for scientific or medical work, Mr. Keller's tutorials are a must-see.


 These are my final submissions for the purpose of the TSA course, but I will continue to work on these models to fine-tune all the important details. And within a week, I will have a surgical scene set-up with the lumbar vertebrae and sacrum complete with joint capsules, ligaments, muscles, cauda equina and more...
Subscribe to:
Posts (Atom)